The Cisco Video Codec API Feedback
If you read my initial post about the XML API on Cisco SX and MX video units you may have notice that the functionality was all flowing from our API client to the Codec. The problem with this is there is no easy way to have the codec itself issue commands to other devices. To put it differently it cannot initiate an action it can only wait for and perform actions. Fortunately, in the 8.X code this problem has been addressed by a feedback mechanism.
Allow me to explain further. Say my application or room control system wanted to know when the codec joined a call, was placed muted, or when a custom widget setting has been changed. I would only be able to detect this change programmatically as often as I can poll the codec for this information. Feedback, on the other hand, sends a notification as soon as the action is performed.
Since its very likely thousands of events happen internally to the codec in only a few minutes of basic use we want to limit the amount of feedback that is actually generated to reduce the load on the codec, the network and the system receiving these events. To do this there is a feedback registration command set. Using the same hierarchy as the command line interface yet again we can select specific items to generate feedback on. As an example, let’s register feedback for any event when the call status changes, or a call is disconnected. Again, we can do this from the CLI or the XML API.
xcommand HttpFeedback Register FeedbackSlot: 1
ServerUrl: http://controlsystem.domain.local/sx
Expression: /Event/CallDisconect  Expression: /Status/Call

OK
*r HttpFeedbackRegisterResult (status=OK):
*r HttpFeedbackRegisterResult FeedbackSlot: 1
** end
Or…
<Command>
  <HttpFeedback>
    <Register command="True">
      <FeedbackSlot>1</FeedbackSlot>
      <ServerUrl>http://controlsystem.domain.local:80/sx</ServerUrl>
      <Expression item="2">/Event/CallDisconnect</Expression>
     <Expression item="3">/Status/Call</Expression>
    </Register>
  </HttpFeedback>
</Command>
You can then verify these settings are in place with the “xstatus HttpFeedback” command. You will see the listing like the following. Note that inapplicable lines have been removed.
xstatus HttpFeedback
*s HttpFeedback 1 Expression: "/Event/CallDisconnect"
*s HttpFeedback 1 Expression: "/Status/Call"
*s HttpFeedback 1 Expression: ""
….
*s HttpFeedback 1 URL: http://controlsystem.domain.local/sx
With this in place call status changed will now push notifications to your control device “controlsystem.domain.local”.
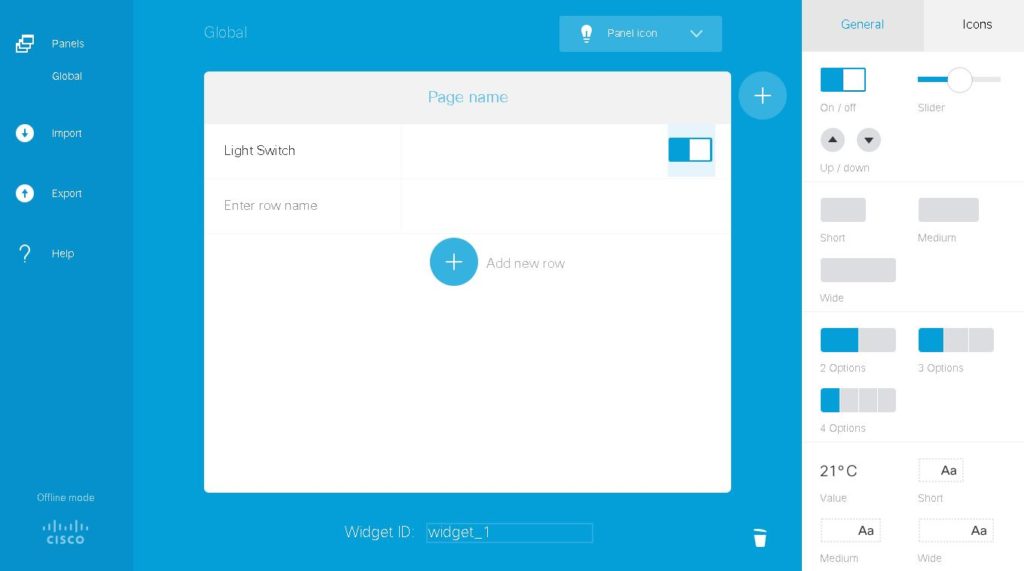
Next, let’s add a custom control item to the Touch 10 that will allow specific user actions to also go to the control system. These could include lighting controls, retractable projections screens, a thermostat or anything else you care to integrate. To create the user interface navigate to the “Integration -> In-Room Control” menu option and click the “Launch Editor” button to edit the interface. I’m not going to discuss the interface creation in depth here with the exception of mentioning that each interface element will allow you to label it. The default labels are “widget_x” where x is a unique number. You can, however, name the widget items anything you would like. A basic widget is illustrated in the UI editor below. Take notice the Switch item has been added and while highlighted displays “widget_1” at the bottom of the screen.
Next, we need to jump over to our control device that is expecting these events via HTTP request. In other words, the control device that has a listening web service. Again, I won’t got into depth in this article but I am personally using a Raspberry Pi computer for this functionality. Commercial applications might leverage a Crestron or similar unit depending on specific needs. The XML sent by the codec and received by the control device on its web service will look something like this:
<Event>
   <Identification>
      <SystemName>SX 20 Lab Unit</SystemName>
     <MACAddress>00:CA:E5:00:00:01</MACAddress>
     <IPAddress>192.168.1.100</IPAddress>
     <IPAddressV6 type='Local'>fe80::2ca:e5ff:fe00:0001</IPAddressV6>
     <ProductType>Cisco Codec</ProductType>
     <ProductID>Cisco TelePresence SX20</ProductID>
     <SWVersion>ce8.2.2.3263c59</SWVersion>
     <SerialNumber>ABC0000000X</SerialNumber>
   </Identification>
   <UserInterface item="1">
      <Extensions item="1">
          <Widget item="1">
             <Action item="1">
		 <WidgetId item="1">widget_1</WidgetId>
		 <Value item="1">on</Value>
		 <Type item="1">changed</Type>
	      </Action>
	  </Widget>
      </Extensions>
    </UserInterface>
</Event>
As you can see there is identifying information about the codec sending the information in the “Identification” node in addition to the information in the “UserInterface” node we expected. This is to distinguish between two codecs that might be installed within the same integrated room environment or at least leveraging the same control system. Once this XML is received and processed by your control system actions can be taken or API calls passed along to other devices in your environment.
I hope you found this information informative. Please feel free to leave feedback or questions below and I will do my best to address them.