
In my first two tutorials I explained the API and how the XML data is passed to and from a Cisco Telepresence codec’s such as a SX or MX unit. In this article I will explain how I more specifically leveraged a Raspberry Pi and Node-Red to both receive commands from the codec as well as how to push data back to it for display on the touch 10.
Receive Codec Commands
First, I will assume you have a basic understanding of the Raspberry Pi and Node Red. In my environment I am running the basic Raspbian Jessie operating system with the latest Node Red software. The version information is displayed when starting the Node-Red application from the Linux CLI.
Started Node-RED graphical event wiring tool..
Welcome to Node-RED
===================
4 Jan 11:04:34 - [info] Node-RED version: v0.15.3
4 Jan 11:04:34 - [info] Node.js  version: v4.7.1
4 Jan 11:04:34 - [info] Linux 4.4.34-v7+ arm LE
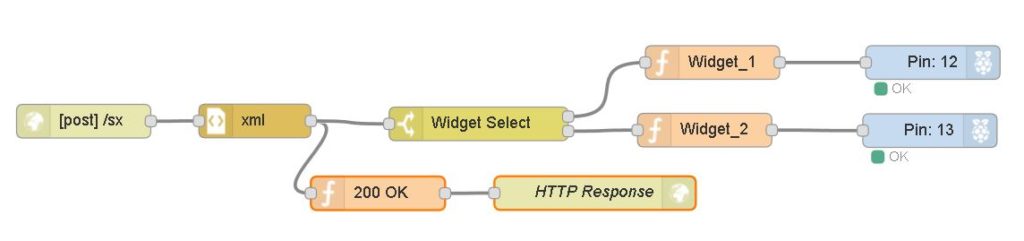
My design is fairly simple. I added an HTTP input node to accept the POST actions from the codec listen at the “/sx” url. You will notice this matches the configuration used in my prior post about the feedback mechanism of the codec.
Since the data posted is in XML format and Node-Red more easily works with JSON data structures I convert with an XML function block. The codec expects a status code of “200” back from the web service so I set the appropriate attributes and send that reply with an HTTP response output node.
If processing calls from multiple widgets, say one for lights and one for a thermostat, you will likely best be served by a “switch” function to evaluate what widget is actually specified in the call. Once converted to JSON the name of the widget specifically is found here in the JSON object below:
msg.payload.Event.UserInterface[0].Extensions[0].Widget[0].Action[0].WidgetId[0]._
My switch statement compares this variable matching either “widget_1” or “widget_2” and then the logic flow extends from there.

Next, I manually coded a function block to evaluate and set the “msg.payload” property to either a “0” or “1” to be compatible with the GPIO pin node I am driving which in turn powers a relay and room lighting. Your application may vary of course. I will note the Philips Hue lighting solution, which is popular for home use, does have an API as well you could integrate with little trouble. Below is the entire Node-Red layout. The code, should you want to import this directly, can also be found here.
Send Data to Codec
To send data to the Codec the process is slightly different. You will need to gather data, in my example the room temperature, concatenate it into XML the codec will accept, and “POST” it to the codec’s API.
In this example I’m using the DS18B20 temperature sensor with the Raspberry Pi. The node in use polls the sensor at a user defined interval; in my case 5 minutes. This node then passes its findings along in the “msg.payload” variable as a number representing degrees celsius. The function block converts to fahrenheit and rounds the number to a single decimal place tacking the units on the end. The codec expects the value to be embedded nicely inside a chunk of XML so next it’s processed by a custom function block and concatenated with the XML required. The XML will of course need to specify the widget you want the data written to. In this case “widget_2”. Yes, I know, there are far cleaner ways to assemble XML but this certainly gets the job done…
1 2 3 4 5 6 | var temp_c = msg.payload; var temp_f = temp_c * 1.8 + 32; var temp_f = Math.round( temp_f * 10) / 10; temp_f = temp_f +" °F"; msg.payload = "<Command><UserInterface><Extensions><Widget><SetValue Command=\"True\"><Value>" + temp_f + "</Value><WidgetId>widget_2</WidgetId></SetValue></Widget></Extensions></UserInterface></Command>"; return msg; |
Finally, the XML is sent to the HTTP request node where it is executed as an API call to the codec. The configuration in Node-Red ends up being only three nodes:

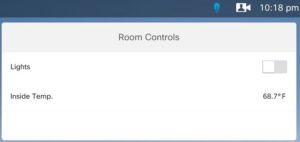
When this is successful you will see the temperature data reflected on the Touch 10 display.
Feel free to use and experiment with these examples. They are intended to get you started. If you have feedback feel free to comment below.
3 Responses to Raspberry Pi Node Red and Cisco Codec Integration