Over the past few years Cisco, and really the entire IT industry, have been abuzz with talk of Application Programming Interfaces, aka API’s. API’s allow devices and services that traditionally have been confined to their own silos to start integrating with other systems. The Cisco Telepresence line is yet another example of this. The Cisco “SX” codec and “MX” video units have a number of integration options. Most commonly used there is a web based RESTful XML API.
This API mirrors what you would expect from the CLI of the device but uses XML to format commands and output. You can configure the codec, initialize calls, and even integrate with a third party room integration system. Let’s look at a few examples.
Let’s look at a CLI configuration example. First, let’s walk out the options with the “?”.
xconfiguration SystemUnit Name ? *? xConfiguration SystemUnit Name: <S: 0, 50> OK |
As you can see there is a variable we can enter here as an argument to “Name”. The “S” signifies this is a string and “50” as in 50 characters in length.
You will also see Integers and Literal values as options for other commands. Be aware that strings with spaces need to be enclosed with quotes as well.
Finally, we assemble and issue the full command.
xconfiguration SystemUnit Name: "SX20 Lab Unit" ** end OK |
If the command executes without error you will get an “OK” as a resulting output or an “Error” otherwise with applicable details about the error that occurred. For example, if we don’t include the string needed to set the system name.
xconfiguration SystemUnit Name: *r Configuration (status=Error): *r Configuration Reason: "Error parsing request" *r Configuration XPath: "SystemUnit Name:" ** end ERROR |
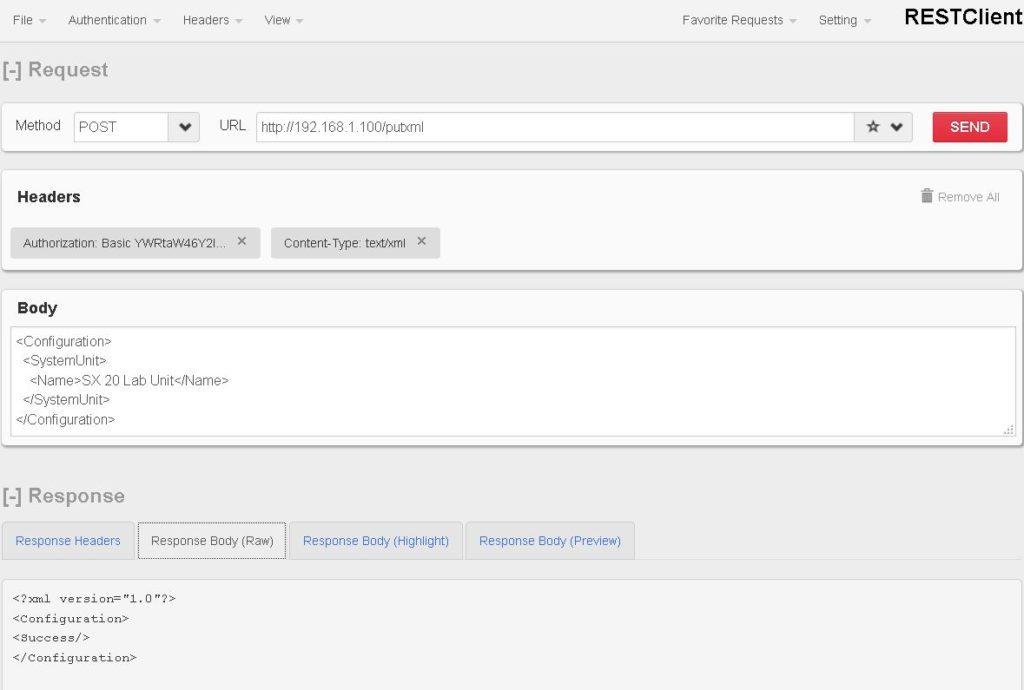
This is great but I mentioned the API is XML. The CLI and the XML interface use the same hierarchy so once you learn one and the steps needed to convert between them you know them both. For example, to send the same system name to your codec via the API you can simply send a POST like the one below:
POST /putxml HTTP/1.1
Content-Type: text/xml


<Configuration>
   <SystemUnit>
      <Name> SX20 Lab Unit</Name>
   </SystemUnit>
</Configuration> |
This can be done programmatically in your application or you can use a RESTful client to experiment with the API calls. Your browser of choice will likely have a number of RESTful clients available. I chose to use the “REST Client” available for Fire Fox. The request shown above included the “Content-Type” header which needs to be set to “text/xml” for the codec to be able to read and respond to the request. Also, take notice this is a “POST” rather than a “GET” request to the codec. Finally, to use the API the codec requires the client to be authenticated. You can programmatically establish and manage a session with the codec. In my case, however, I am using basic authentication with each API call that’s made. Below you can see my API client after issuing the request.
As you can see the API also returns a status message on success or failure.
Setting the system name is clearly a very basic example. I have included a few other commented examples here as to help you get started. I have the CLI command and the comparable XML command both shown.
#Place a video call

xcommand Dial Number: endpoint-address@domain.com

<Command>
   <Dial>
      <Number>endpoint-address@domain.com</Number>
   </Dial>
</Command>


#Disconnect the active call

xcommand call Disconnect

<Command>
   <Call>
      <Disconnect></Disconnect>
   </Call>
</Command>

#Enable self-view with the image centered vertically on the right side of the screen.

xcommand Video Selfview Set FullscreenMode: Off PIPPosition: CenterRight Mode: On

<Command>
   <Video>
      <Selfview>
         <Set>
            <FullscreenMode>Off</FullscreenMode>
            <PIPPosition>CenterRight</PIPPosition>
            <Mode>On</Mode>
         </Set>
       </Selfview>
   </Video>
</Command> |
I hope you found this useful! I my next post I will discuss the graphic interface extensions of the SX and MX systems and touch 10 and how they can be used to display data and publish commands to other API’s such as those of room control systems.


2 Responses to Cisco Telepresence Codec API by Example