If you have yet to checked out monowall I suggest you do so now. It’s a very lite, easy to use firewall distribution built on BSD. It boasts many features including packet filtering, VPN support, NAT, Captive portal, VLAN interfaces, IPv4 and IPv6 support and a traffic shaper to name a few. I have posted about the IPv6 capabilities in a previous post if you care to check it out. Today, however, I will be discussing rate limiting with the traffic shaper.
Recently I was called to implement a system to limit the bandwidth used by our guest network. There was no firewall in place for this network aside from the device provided by the ISP. Needless to say, it was junk and supported none of the more advanced features we needed. I implemented a Monowall with a fairly typical setup and jumped into configuring the traffic shaper. In this article I will only be limiting traffic and will not be discriminating based on the actual type of traffic but will simply limit everything.
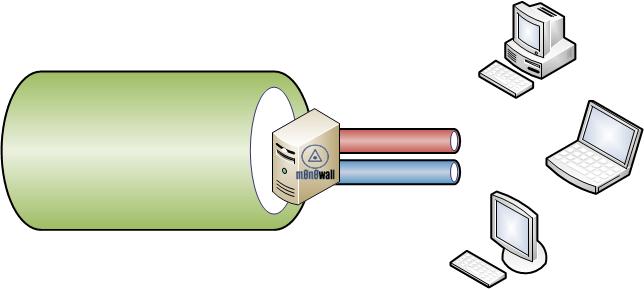
First, let’s discuss how the monowall shaper works. It uses “pipes” to control traffic. A pipe is simply a mechanism to limit throughput. Each configured pipe simply gets a number, in kilobits per second, assigned to it. In my first example we have a 10Mb/s connection on the WAN side of the Monowall but would like to limit the throughput from all hosts to a total of 1Mb/s. Let’s depict our setup with the image below. The green pipe is our provider’s connection. The red is up stream and blue is downstream “pipes”:
Secondly, we will configure the monowall to allow each host a full 1mb/s:
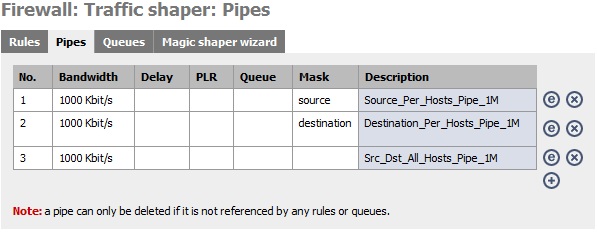
To create either of these setups you first have to create the pipes in the monowall configuration. This is under Firewall-> Traffic Shaper. To experiment with each of the scenarios we will need a total of three pipes. Create each pipe specifying 1000 Kbit/s. One pipe will need no mask, one will need a source mask and one will need a destination mask. The mask, when enabled, will be used for matching source and destination rules we will be talking about in a second. Add a description to each pipe to make it easier to pick out later. You pipes should look something like this:
Great! Now, let create some rules to limit traffic based on the IP subnet the hosts are a part of. I am using the 172.30.1.0 subnet; yours may be different so substitute where needed. To match outbound traffic specify the network in the source field and for incoming traffic use the destination field. More advanced rules actually allow you to specify deeper packet information such as protocol, flags and type of service but I will get into that in a later article. The final piece to creating rules is to map the rule to a specific pipe. Earlier I gave two different limiting scenarios. To achieve the first and limit the total bandwidth for all hosts we would select the pipe with no mask specified. The second example was to limit each host individually to 1 Mb/s. To do this we have to look at each rule in more detail. If your rule is focused on traffic going out, map to the source pipe; If the rule specifies incoming traffic map to the destination pipe. To clarify a bit, source and destination are referring to the actual addresses in the packets as they enter or exit an interface. This is probably this most difficult part to understand so be sure to included proper and clear descriptions on all of your rules and pipes. With this completed you should now be have a rule set similar to what I have below (assuming you are limiting per host like in figure 2):
To recap, the above will limit on a per host basis. If you really wanted to limit everyone to a maximum of 1Mb/s total you would follow the same procedure but instead map to the pipe without a mask specified.
Once your configuration is committed its time to test! For this I simply opened the live traffic graph that’s part of monowall. This can be found under Status -> Traffic Graph. You can see my traffic graph below.
I have a few different points numbed on the graph. At 1 I was running a download on a single host. At point 2 a second host began downloading. At point 3 a third host began to download. At point 4 a speed test began downloading and at point 5 the speed test began its upload. As you can see each host was limited to 1Mb/s but the total amount of throughput was not capped.
I hope this was useful to anyone searching for traffic control on a monowall! Feel free to comment with questions or suggestions below.


