There are many reasons to want only a single SSID available in your wireless air space. There is less overhead traffic and frequency overhead and users have a simpler experience to name two pros. One downfall, however, is that every device gets dropped into the same VLAN with the same security settings. Fortunately, this issue is addressed fairly easily with some additional configuration of your Cisco Wireless LAN Controller and a RADIUS server.
For this guide I will assume you are already familiar with the basic steps to setting up general network connectivity and 802.1X wireless authentication with RADIUS and a Cisco WLC.
First configure the controller with an additional interface. This interface will need to be configured with the VLAN tag you will want your new hosts to fall into. This can be done under Controller-> Interfaces. The VLAN should already be configure out on your network with DHCP and other needed services and access you will need. You can configure this VLAN with different ACLs than the VLAN in your existing configuration.
Next, navigate to WLANs and then to the WLAN SSID you would like to use. You should already have an interface assigned to this WLAN. You will notice, however, that the interface is different than the one we just configured. This is fine as typical authentication will still put users into this VLAN.
Switch to the advanced tab of the WLAN configuration. There are a lot of options here but the option we will concern ourselves with is the “Allow AAA Override” check box. Enable this option. This allows that AAA servers (Radius in our case) to push configuration back to the WLAN as part of the authentication accept message. The Radius attributes that get sent back to the controller are:
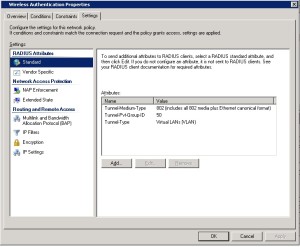
Tunnel-Type [64] – This should be set to “VLAN” in the response.
Tunnel-Medium-Type [65] – This should be set to “802”.
Tunnel-Pvt-Group-ID[81] – This will be the numeric VLAN ID.
To actually configure this on Windows NPS server you will need to create or edit an existing authentication policy. Under the “Conditions” tab you will have to select the conditions that best suits your environment. I typically assign a Windows Group, a Client IPv4 Address (the IP of the controller) and a NAS identifier. The NAS identifier is actually configurable on the controller under “NAS-ID” in the “General” tab of the WLAN settings. I like to use these settings to ensure the only access-accept messages my RADIUS server generates are specifically for the purpose they are intended. The incoming attribute matching features of NPS are lacking and I have personally had this happen before. It can in fact cause security issues if you are not aware of it.
The RADIUS attributes listed above can all be found under the “Standard” RADIUS Attributes section in the Settings. This is the information that is sent to the controller dictating how the client’s connection should be configured. Add and configure each until you get something like this:
Finally, connect a client and user with credentials that will match your new policy. If all settings are properly configure your client will be IP addressed in the new VLAN but will be attached to the existing SSID. If your system does not properly authenticate review the windows security log for NPS events. Additionally, review settings and logs on the wireless controller as well.
I have included some outside resources below for additional and more detailed information.
http://www.cisco.com/en/US/tech/tk722/tk809/technologies_configuration_example09186a008076317c.shtml
http://technet.microsoft.com/en-us/library/dd197472%28WS.10%29.aspx
http://www.cisco.com/en/US/docs/wireless/controller/7.2/configuration/guide/cg_security_sol.html#wp1104164

