Cisco CUCM 8861 / 8865 Wireless Configuration
The standard mode of operation is typically to wire your IP phone into the network lighting things up with wired Ethernet and PoE. In the case of the 8861 and the 8865 phones you have the option to disconnect the PoE, power up with a 48-volt power brick and take to the Wi-Fi air waves. You can configure the wireless settings manually from the Admin Settings section of the phone or from Cisco Unified Communications Manager (CUCM). The manual configuration option is great for a quick configuration but it doesn’t scale well and frankly is not something users can handle on their own should the need arise. The best option is to fall back to CUCM and configure it there.
To preconfigure the wireless settings you will need to create a Wireless Profile and a Wireless Profile Group. These two options are under the same menu in CUCM. Navigate to Device->Device Settings->Wireless LAN Profile or Device->Device Settings->Wireless LAN Profile Group respectively.

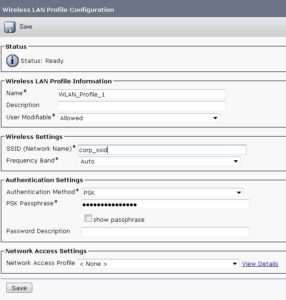
You will need to create the Profile first. These are the variables need to connect specifically. SSID, Pre Shared Key (PSK), authentication type, etc are found in the configuration item. You can see some of the options enumerated below.
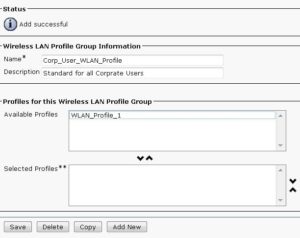
Next, you need to add this newly created profile to a Profile Group. More than one profile can be added to a Profile Group as the Group idea would suggest. You can see the previously created Profile shown in the Profile Group configuration below.
Finally, the Wireless Profile Group is then assigned to the phone under the Phone configuration pages for the phone. The option is “Wireless LAN Profile Group” just above the drop down for assigning a user to a phone.

For good measure I also set the “Wi-Fi” setting to “Enabled” checking the box to override other enterprise wide or Common Phone Profile settings. If you are applying the same Wireless LAN Profile Group to a group of phones then you may want to move up stream to push this information in via the Common Phone Profile option instead.
Once configured you will need to boot the phone via standard wired connection to pull this latest configuration. Once loaded you can verify the SSID, etc is listed on the phone under Settings (The gear button)-> Admin Settings -> Network Setup -> Wi-Fi Client Setup. Scroll through this page to verify the options where picked up from CUCM. The phone should now be ready to use on the wireless network.
Disconnect the phone from the wired network and connect it to a power brick. The phone will boot and indicate it’s attempting to connect. Again, select the gear icon -> Admin Settings -> Network Setup -> Wi-Fi Client Setup. The first option should be “Wireless”. Using the soft key on the right toggle this to “On”. If your configuration is correct the phone will acquire an IP address via the wireless network and register to Unified Communications Manager as you would expect.