
When administering Cisco network gear it’s always nice to be able to login with your typical admin credentials. You change one password and it changes over all systems. It’s not uncommon for organizations of many different sizes to use RADIUS backed up to Active Directory to achieve this.
The simplest setup is typically to allow network admins full access to the CLI and nothing for everyone else. Typically, that works well. I wanted the helpdesk guy to get some Cisco experience while not having the ability to make a bunch of changes. There were a few different articles out there on making this all happen so I started there. As it turned out only one or two of them explained it decently and there were some statements that just didn’t work so I figured I would try my hand at it as well.
First things first, we need to setup AAA and RADIUS on our Cisco switch or router. I am speaking to late 12.4 and early 15 releases of the IOS by the way. The applicable configuration is shown below:
aaa new-model
aaa group server radius RADIUS_SERVERS
 server name RADIUS01
aaa authentication login VTY_AUTHEN local group RADIUS_SERVERS
aaa authorization exec VTY_AUTHOR local group RADIUS_SERVERS
radius server RADIUS01
 address ipv4 192.168.1.35 auth-port 1645 acct-port 1646
 key 0 radiuskey
line vty 0 4
 login authentication VTY_AUTHEN
 transport input ssh
To break it down a bit, the first block groups the multiple RADIUS servers together for simplicity. You will see this called in the next section of configuration.
The two AAA lines specify what databases or authentication sources to use when authenticating and authorizing. You can see the “local” user database is first and then the RADIUS servers group second. I personally like to configure this way and maintain a just-in-case account on the devices in case RADIUS services are down or unavailable for some reason. You will also notice the “VTY_AUTHEN” piece. This will be referenced in the line configuration in a second…
The next block is configuration pointing to the actual RADIUS server. You can see the IPv4 address and key information under this as well as you might expect.
Finally, the configuration for the actual lines that will accept the SSH/Telnet sessions wraps things up. The example above simply authenticates and allows logins. By default it will take the user to the unprivileged prompt. A quick “enable” followed up by the enabled password takes you to privileged mode.
To this point everything is fairly basic on the router and on the RADIUS server side. Let’s start with a security refresher. “Authentication” answers “are you who you say you are?” while “Authorization” addresses “what are you allowed to do?” Above, RADIUS is only proving the users identity, not granting a level of access based on a policy within NPS. If we want to specifically grant all Authenticated users to have level 15 access we can simply add this under the vty line configuration:
privilage level 15
As indicated above, however, this is not our goal. To actually authorize privilege levels based on the av-pair information returned by the RADIUS server we have to tweak the line configuration again. You should end up with something like this:
line vty 0 4
 login authentication VTY_AUTHEN
 authorization exec VTY_AUTHOR
 transport input ssh
You can now see the “authorization exec” command pointing to the “VTY_AUTHOR” authorization mechanism put in place earlier.
To wrap this all up we need to jump over to our NPS server and configure the policy to return the appropriate information needed to take each authenticated user to his or her specified authorization level.
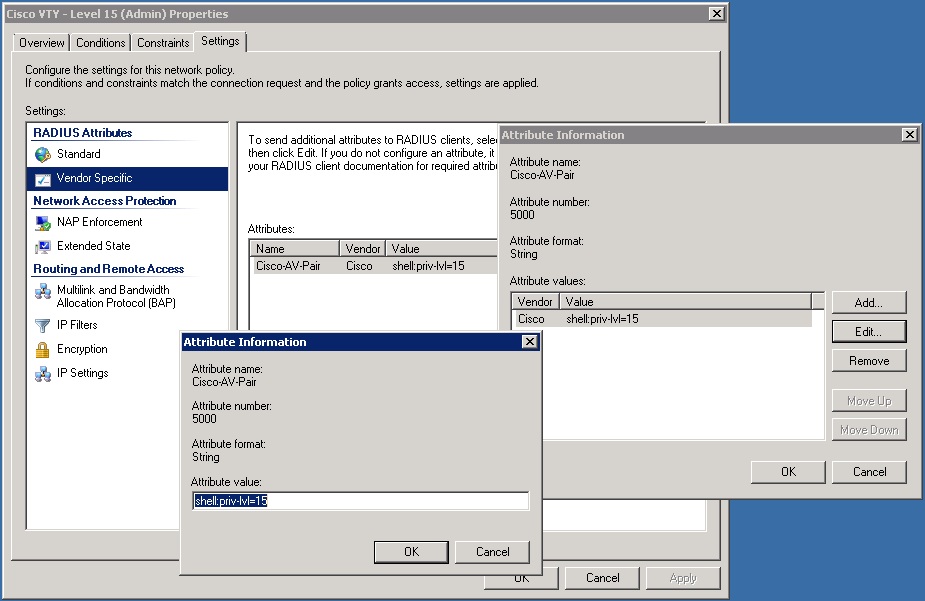
I am going to assume you have some basic knowledge of NPS for this. Please let me know if any of the key points are unclear by commenting below. We will establish two policies. Under the Conditions tab the policy should include an Active Directory group specifying your network administrators. I also like to use regular expressions here to limit the clients IP addresses (the Cisco devices we are logging into) that RADIUS requests are answered for. That piece is up to you of course. Next, in the Constraints tab, you need to select PAP for the EAP method. Finally, under settings you need to add a vendor specific RADIUS attribute. The attribute should be the av-pair:
shell:priv-lvl=15
To put this into NPS perspective the configuration windows are shown below with this setting applied.
To create an authorization level for other users, your helpdesk guys for example, follow the same steps but use a different priv-lvl in your av-pair string. For instance:
shell:priv-lvl=7
Finally, to allow the helpdesk users to key in commands on the IOS device you have to explicitly bring the commands down to their privilege levels. Let’s allow viewing of the startup configuration for instance:
privilege exec level 7 show running-config
There are obviously many more privilege level options. I will let you explore these on your own. If you would like to do some additional reading on this be sure to check out the resources below or comment accordingly.
1. http://www.cisco.com/en/US/docs/ios/sec_user_services/configuration/guide/sec_rad_ov_ietf_attr.html
2. http://www.cisco.com/en/US/docs/ios/12_2/security/configuration/guide/scftacat.pdf
3. http://www.cisco.com/en/US/docs/wireless/prime_infrastructure/1.3/configuration/guide/pi_13_cg.pdf

4 Responses to Cisco Privilege Level Access with Radius and NPS Server