
To take a screenshot on an 8800 series phone you will be following basically the same procedure as prior model phones.
First, let’s verify a few settings.
The web Server will need to be enabled for the phone. This is the “Web Access” Option on the phone configuration within CUCM. The “Web Access” can also be enabled through a Common Phone Configuration or through Global Enterprise Settings. These settings a located at “Device->Device Settings->Common Phone Profile” and “System->Enterprise Phone Settings” respectively.
Next, you will need to ensure an end user account has access to manage the phone. This is actually different than having a user selected under the phone configuration or a user associated under the line configuration. This mapping is done under the “User Management->End User” menu. You then select the end user to configure. Under that users settings in the “Device Information” section and the “Controlled Devices” option you can query and select phones that this user can control.
With user control of the phone we can now attempt to log into the phone. Find the Phone’s IP address and format it into a URL in the follow way opening in your browser http://<ip address>/CGI/Screenshot. This is case sensitive. You will have to authenticate with the username and password of the user linked to this phone in the step above.
Troubleshooting:
If you get an error message that’s something like:
<CiscoIPPhoneError Number=”4” />
The problem is most likely authentication related. Verify the phone is under the control of a user and that the users credentials are correct.
To further troubleshoot you can use the following URL to verify the authentication directly against Unified Communications Manager substituting your values as needed:
https://<CUCM IP> ccmcip/authenticate.jsp?UserID=<username>&Password=<password>&devicename=<phone name>
If the information all lines up the browser will display a simple “AUTHORIZED” or otherwise and “UN-AUTHORIZED”. Ultimately you will be seeing something like this from your browser:

If this works but the Phone is still showing the error above reset the phone and try again.
<CiscoIPPhoneError Number=”0” />
Is another error. This one is most frequently indicating that the Phone cannot connect to the URL provided in CUCM for authentication. There are a number of things that could cause this but almost all have something to do with reachability. Verify DNS, routing, etc to the CUCM from the phones.
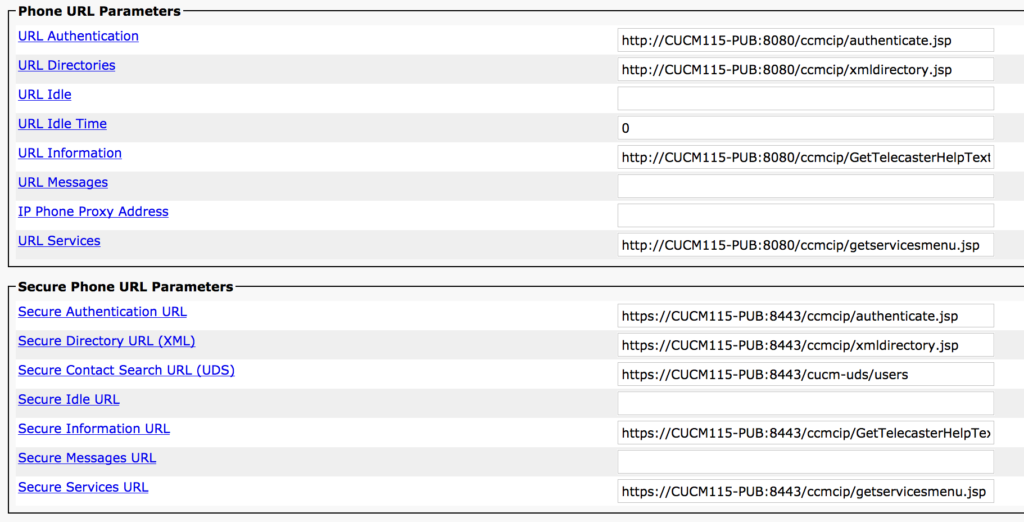
Another potential problem could be that the parameter is formatted incorrectly. The authentication URL should be something like shown below listed under the “System->Enterprise Parameters” menu. My system is named “CUCM115-PUB” as you can see it reflected in the Enterprise URL settings:
I hope you found this information helpful as you work with your new 8811, 8841, 8851, 8861, 8845, and 8865 phones! Feel free to comment with any other tips or tricks you have found helpful as well.

3 Responses to Taking a Screenshot on an 8800 Series Cisco Phone