Today I want to talk about the flexibility, security, and convenience of using SSH Tunneling and Proxying to connect to your remote network devices. The SSH tunnel will act as a VPN of sorts to get us inside the network where remote access is otherwise not available. These examples will also wrap the traffic in a layer of security since all SSH tunnel traffic is encrypted.
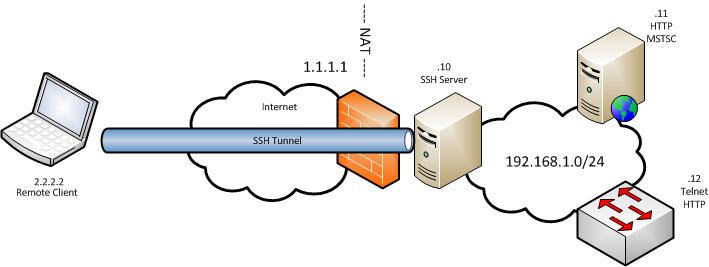
To get started let’s have a look at the diagram below:
The laptop is our remote user and the network on the right is the network with some devices that we could like to connect into. There is only one external IP address that all internal traffic NATs out through. The SSH TCP port 22 is forwarded through the firewall to the SSH Server. These are the only firewall allow rules in place in our network. In this example we will be connecting to the desktop of the .11 server, making a telnet connection to the .12. switch and will be making HTTP connection to each.
In my test network the SSH server is a Linux box running a standard installation of CENTOS. You obviously can choose any distribution you would like. Be sure tunneling is enabled and properly configured. With CENTOS it’s on out of the box. Another pre-requisite is the putty SSH client. You can do this type of thing with other SSH clients as well but that is outside the scope of this tutorial.
MSTSC Tunneling over SSH
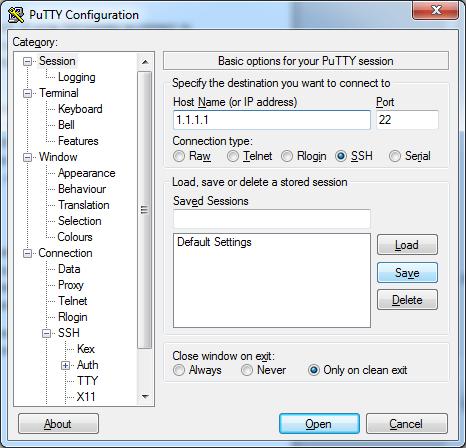
OK, so with all of the basic stuff out of the way let’s make a connection! First, ensure you can connect to your SSH server from outside. You can? Good! Let’s first connect to our MSTSC server with the Windows RDP client. We will need to open putty and do the following:
- Enter the hostname or IP address that will get you an SSH connection to your internal SSH server.
- Jump to the Connection->SSH->Tunnel Options. Enter the IP address and port number of the service you would like to connect to. In this instance we want the IP of 192.168.1.11 and the MSTSC port of 3389. You also see the “Source Port” option is filled in. This is the port our system will actually be listening on for a connection. This is our remote clients end of the tunnel.
- After everything in step 2 is completed be sure to click “Add” to fill in the “Forwarded Ports” box. You can now click “Open” to initialize the connection. When prompted type your SSH servers username and password as normal.
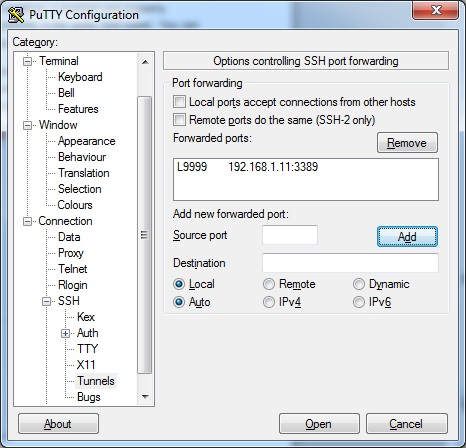
- If all went well the tunnel should now be established. You will want to keep the terminal window open as long as you need the tunnel. Closing the SSH terminal will also terminate the tunnel.
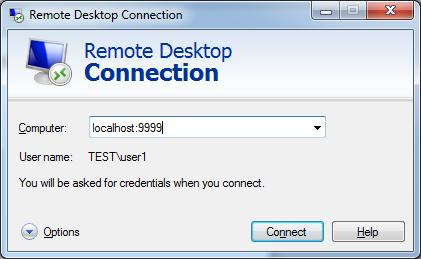
To use the tunnel to transport the MSTSC traffic you will want to open the client and connect not to the IP of the internal server but rather to your local system and on the port number you selected in the tunneling settings. This would look something like this:
What just happened there? Putty established a tunnel and listens on your system for connections on port 9999. The other end of the tunnel is established on the SSH server inside your network. When you connect the localhost:9999 the port forward settings know to transform and forward the specific traffic through the tunnel. As you can see below the server responded and is requesting I authenticate:
TELNET and HTTP over SSH
In the previous example, we wanted to tunnel traffic from the Remote Desktop Client to a server. The Client software did not give us the option to specify a proxy. In this next example, however, we DO have the option of a proxy. I will be showing you how to do this with HTTP traffic as well as Telnet traffic.
- Fire up putty and again specify the IP that will get you a connection to the SSH server.

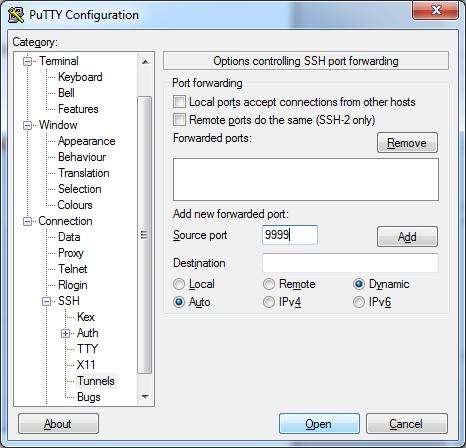
- Next, just to the “Connections->SSH->Tunnels” options. This time you will want to select “Dynamic” for the destination. Select an unused port on your system for the “Source Port” and select “Add”.
- Open the connection and log in like you typically would with a shell-only connection. A tunnel should now be in place. At this point, you can basically tunnel anything through the tunnel assuming it will allow you to specify a SOCKS proxy within that application.
At this point, I will break the steps of this tutorial out separately. First, let’s move some HTTP traffic through our tunnel.
- Open up your browser and navigate to the proxy settings. In Firefox this is under “Tools->Options”, A windows will open. Select “Advanced” at the top and then select the “Network” Tab. Click the “Settings” button from there and the proxy settings will be displayed. Enter your localhost as the proxy and the port you selected in step 2.

- You can now type the IP of the HTTP server within your network that you would like to connect to into your browser’s address bar!
Ok, so now that your HTTP traffic is tunneled let’s tunnel another insecure protocol; Telnet.
- For this you will need to open a second instance of putty. Enter the IP address and select the “Telnet” radio button.

- Go to “Connections->Proxy” and enter your local host as the proxy with the port number you selected when building the tunnel.

- Open the connection! Your traffic should now be tunneling over the SSH connection established earlier.
A final thought: With examples like the one I just went through your traffic never leaves the host without being tunneled. In the MSTSC example you ‘connect’ to your localhost can the traffic if forwarded over the tunnel. With the HTTP and TELNET examples, you specify a proxy to forward the traffic. You will not be able to connect to the devices or hosts inside your network unless the tunnel is functioning properly. The only way into your network is over the tunnel.
I hope everyone finds this useful!





6 Responses to SSH Tunneling and Proxying